
… and how to get rid of it.
[update 02/05/2018 The information how to create camera noise profiles is outdated please read this tutorial instead!]
[update 20/12/2012: ‘how to profile your camera’ includes instructions with the new gen-profile script]
[update 15/12/2012: no more recompile needed, updated the instructions in the benchmark section and how to run make.sh.]
to summarize the current situation in dt: we have a lot of cool tools wrapped around great algorithms with almost all the knobs you need to get perfect results. while you can actually get really great results it’s this sheer number of knobs that makes finding a good parameter set quite a time consuming task. even creating per-iso presets is not straight forward, as most of the current modules depend on a lot more stuff early on in the pipe (whitebalance, exposure, basecurve, etc).
in the following, i’d like to look into automating this process and (after some calibration work, which could be optional, but less optimal) then something closer to a single-click solution. the plan is:
- design a module where the denoising performance only depends on camera and iso setting.
- profile (camera, iso) pairs and store presets for each one of those (can be interpolated potentially).
- auto-apply them in switched-off state, so you can enable the right thing by just clicking the module’s ‘off button’ once.
[update 20/12/2012: this work is now in git master]
background
a lot of research is centered around denoising images corrupted by additive white gaussian noise. this means that your input signal x is observed as
$$y = x + n, n \sim \mathcal{N}(0, \sigma^2).$$
unfortunately, digital cameras don’t follow that pattern, so the noise is mostly dominated by some sort of signal-independent sensor noise and signal-dependent photon noise (or ‘shot noise’). this non uniform noise follows a poissonian-gaussian distribution [2]
$$y = \alpha p_i + n_i, p_i \sim \mathcal{P}(x), n_i \sim \mathcal{N}(0, \sigma^2).$$
a poissonian is a discrete distribution, emerging from quantized photon behaviour. alpha converts this to a number range we use in image processing ([0, 1] with extrapolated hdr headroom in the case of dt). to be able to apply general denoising procedures, we need to stabilize this noise via a transform [0].
denoising is then done in three steps:
- transform to map variance to unity uniformly all over the image,
- denoise with a generic method against additive white gaussian noise,
- backtransform
academia seems to fight additive white gaussian noise with current king-of-the-hill bm3d [6] and extensions. dt uses bilateral filters or non-local means [5]. the latter combined with a relatively simple extension [4] has been shown to perform quite well (fast, next to no implementation overhead for us).
there are very elegant wavelet based methods, too [3], so i also tried to drop in our wavelet code using bayes-shrink with an overcomplete wavelet transform, i.e. do a soft threshold shrinkage with threshold:
$$T = \sigma^2/\sigma_x = \sigma^2/\sqrt{\max\left{0, \sigma_y^2-\sigma^2\right}}.$$
the results had certain wavelety artifacts, so the following is using our nlmeans code to remove additive gaussian noise.
example
to illustrate the above noise model, here’s a plot of noise standard deviation sigma vs. brightness from a canon eos 5dm2 at iso 3200:
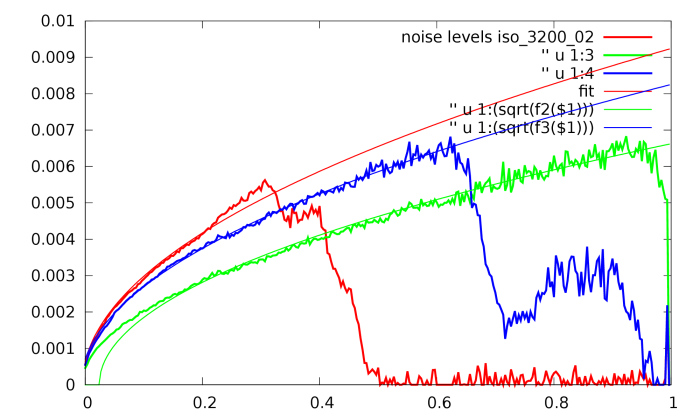
note how noise increases at higher brightness (caused by the poissonian distribution) and has a global offset (caused by the additive gaussian). only the green channel is saturated, the other two channels absorb too much of the light to go all the way to the right.
noise is estimated via mad (median of absolute deviations) on the finest hh coefficients of a wavelet transform, assuming zero mean. this is why the calibration shot needs to be out of focus, we want to minimize the spill of edge information into the hh coefficients. the median estimator is robust to a few outliers, but we still want to violate the assumption that the finest wavelet coefficients only contain noise as little as possible.
to fit an analytical model to these curves, we approximate
$$\mathcal{P}(x) \approx \mathcal{N}(x, x)$$
and fit this noise model to it [2]:
$$\sigma(y) = \sqrt{\max\left{0, a\cdot y + b \right}}.$$
note that our fit in the above graph (smooth curve, green) goes below zero, which can be caused by the black level (which is subtracted in these input numbers).
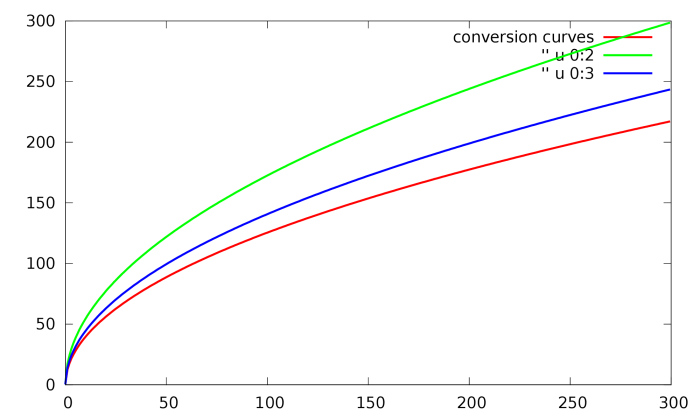
these fits can be used to construct conversion curves [1], which look as follows:
applying those to an image, and then computing the noise levels vs. brightness again, we get this nice flat graph that mostly shows sigma=1 (which indicates white additive gaussian noise, yay!):
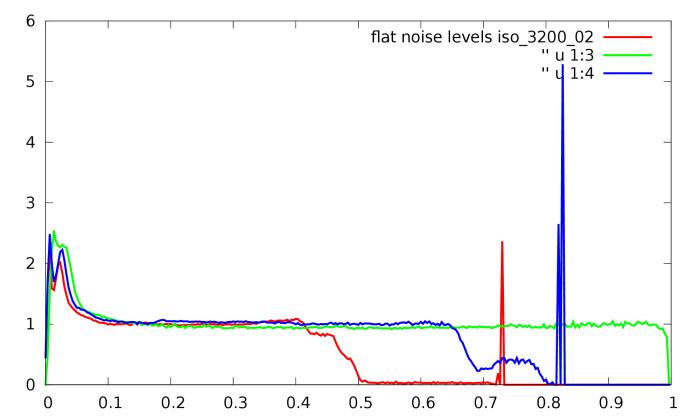
this is easy to process with your favourite denoising filter (wiener filter and dct, bm3d, wavelet-based methods, nlmeans etc).
all that remains to be done is to map the values back to their original range. note that the algebraic inverse of the mapping is the wrong thing to do; we want an unbiased inverse [1].
results
this table shows some numerical results in terms of peak signal to noise ratio before and after denoising. the reference image is the mean of two iso 100 shots.
| iso | psnr noisy | psnr denoised | psnr handtuned |
| 100 | 41.3101 | 41.9915 | |
| 100 | 40.6879 | 41.3296 | |
| 400 | 34.5583 | 38.4054 | |
| 800 | 31.0149 | 33.6109 | |
| 1600 | 29.5853 | 33.9332 | |
| 3200 | 25.8187 | 29.4477 | |
| 6400 | 23.5462 | 28.7782 | 28.5843 |
| 12800 | 20.4019 | 25.5775 | 25.6052/25.629 (*) |
| 25600 | 17.1598 | 24.7214 |
interestingly, i get better results out of iso 1600 than from 800. this can have a lot of causes and it would have been a good idea to measure the camera’s native iso levels instead of powers of two.
here are a couple of 1:1 screen grabs to illustrate the numbers. from top to bottom: iso 3200, 6400, 12800 and 25600 with one-click denoise results:
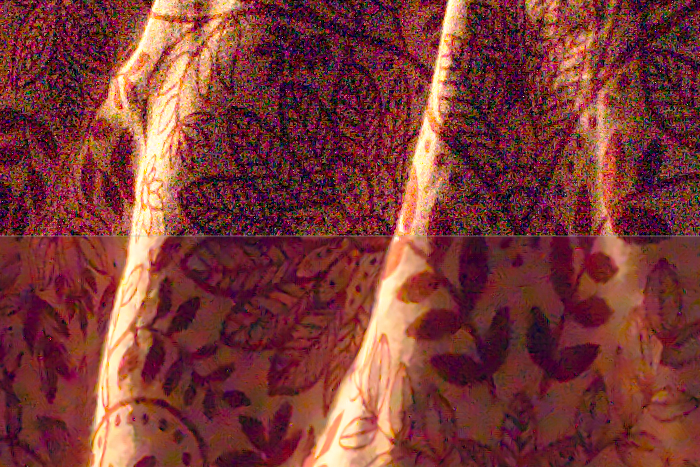
iso 25600 seems to have trouble with the black level, judging by the color cast (lifting the black level manually helps a little, fixing whitebalance instead of using auto made things worse). apart from that i’m still not going to recommend it for everyday use, but maybe downsized resolutions will be useful for some purposes at times.
how to profile your camera
The following information is outdated please read this tutorial instead!
the parameters (a, b) have to be found for each (camera, iso) pair. these are then stored in a preset for a new denoising module. there is a generic (poissonian only) preset, but you can’t dial in these values manually, you have to create a preset for your camera and iso (if it doesn’t already exist).
to generate a profile, dt ships a couple of scripts and tools in tools/noise/. it will create presets as well as a couple of detailed data plots used to verify the usefulness of the result, such as the curves seen above.
the steps in detail:
taking noise profile images
The following information is outdated please read this tutorial instead!
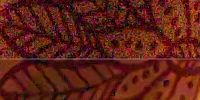
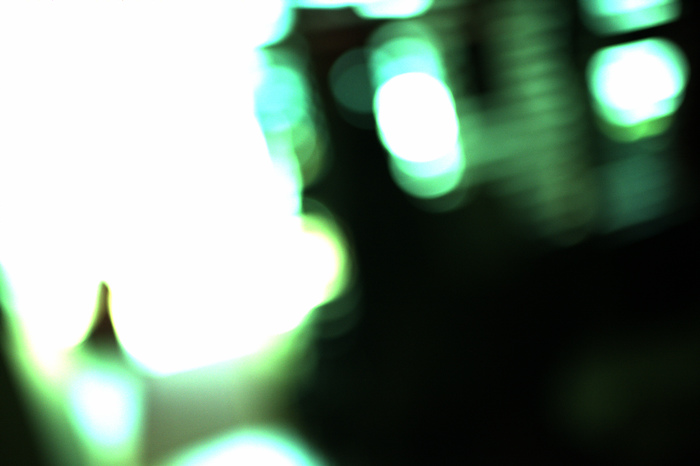
take one shot per iso. it has to be out-of-focus and have a widespread histogram, i.e. be over- and underexposed at the same time (see example image below). if you want to be thorough, take 2–3 to verify the numbers.
this image looks very green, because the ‘raw linear’ style has been applied to it (find it in darktable/tools/noise). this makes sure we get linear camera raw rgb with no basecurves, no whitebalance, etc in the way. it is essential that you apply this style.
you can either take those shots manually or have
~/darktable/tools/noise/gen-profile
take them for you via gphoto2. you need gphoto2, exiv2 and gnuplot installed to run the script (well, plus various coreutils).
your images should look something like this:
generate plots and fits
The following information is outdated please read this tutorial instead!
open a terminal, go to the directory you just exported your images to. from there, type
~/darktable/tools/noise/gen-profile -d .
this will create a ton of informative pdf files, which should look like the above examples. if the fit doesn’t match the curves, or the curves look wildly different than the general shape in the plots above, something went wrong (most likely your image wasn’t overexposed enough, so check the histogram). this script will output a file presets.txt with copy/pastable presets for your camera, to be shipped with dt. one line will look something like:
{n_("canon eos 5dm2 iso 3200"), "Canon", "EOS 5D Mark 2", 3200, {1.0f, 1.0f, {4.494e-05, 4.494e-05, 4.494e-05}, {-1.063e-06, -1.063e-06, -1.063e-06}}},
the exif data (model, maker, and iso) is used to do automatic matching of the correct preset, so you only need to enable the module.
additionally, this script will copy your darktable database, inject the newly created presets for you to test, and instruct you how to run dt with that library for a test.
run a benchmark (optional)
this requires additional shots. since we want to verify what we did was reasonable, we want (and need) independent input.
to test the presets you just created, you have to run darktable as instructed at the end of the script, something like:
darktable --library /tmp/library.db
take one image for each iso setting you’re interested in (same iso sequence as above). for iso 100, take 2–3 of them. it is essential that these images only differ in iso and exposure time (take them with a sturdy tripod and aperture priority mode).
create a reference image (use the ‘create hdr’ button in lighttable mode with a couple of iso 100 shots).
you don’t need to apply any styles this time, leave the images as natural as possible (but all the same).
export your images as float pfm to the same directory (filename iso$(EXIF_ISO) is a good idea), also put the reference as reference.pfm in there.
apply the newly created presets to your images, export them in that directory too (float pfm, use iso$(EXIF_ISO)_denoised as a filename for example).
then run
~/darktable/tools/noise/benchmark.sh
to verify that the psnr values are reasonable. the denoised version should always have a higher psnr than the input (even for iso 100), the values should be in the range of the above table.
ship it!
send your new presets to one of our mailing lists, or upload them to some pastebin or similar and let us know in irc. we might also be interested in the pdf files with the plots, to verify your fits worked out and everything looks fine.
using the new ‘denoise (profiled)’ module
the goal of this work was to give you a simple, single-click denoiser that always just works (tm). there are still a few options exposed for your tweaking pleasure, though these affect how the nlmeans core works. the conversion curves are not exposed to the user, but there is a generic preset for non-profiled cameras which will try to roughly do something reasonable.
- patch size: 0 will degenerate to a bilateral filter. increasing the number will increase sharpness in your output, but you might have to increase ‘strength’ to counter balance the effect.
- strength: make denoising stronger (> 1) or weaker (< 1). mostly a matter of taste. the default setting was chosen to maximize psnr in my tests (with a patch size of 1) .
future work
it seems that the fit parameters (a, b) behave quite nicely with iso, so it might be possible to interpolate them for your exact iso setting. see for example this plot of the parameter a (poissonian component) for a canon eos 5dm2 indicating that simple linear interpolation will be enough:
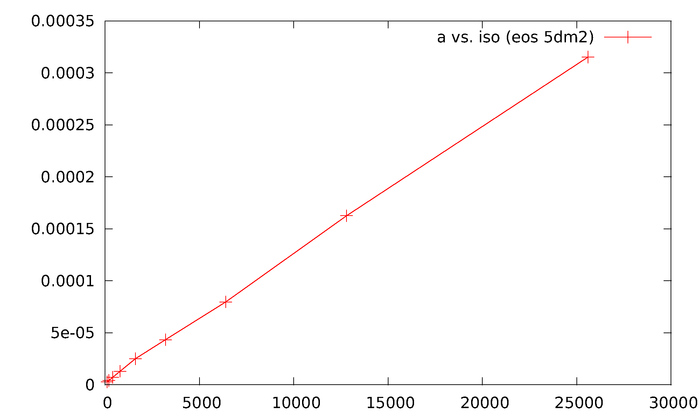
it should also be easy to auto-create this graph as a quick sanity check for new presets.
the influence of exposure time on the gaussian part is another thing to take into account, especially the case when the black frame is subtracted in camera.
[update 23/12/2012: this interpolation is now happening automatically in git master when you enable or reset the module]
the bottom line
if you’re not into signal processing and don’t like to profile your gear, just hope someone already measured your camera, enable the new denoising module and enjoy parameter free optimal denoising. it’s magic!
references
- [0] paul prucnal, bahaa saleh: transformation of image-signal-dependent noise into image-signal-independent noise, optics letters, vol. 6, no. 7, 1981.
- [1] markku makitalo, alessandro foi: optimal inversion of the generalized anscombe transformation for poisson-gaussian noise, ieee trans. image process.
- [2] alessandro foi et al.: practical poissonian-gaussian noise modeling and fitting for single-image raw-data, ieee trans. image process. vol. 17, no. 10, 2008.
- [3] frolian luisier, thierry blu: a new sure approach to image denoising: interscale orthonormal wavelet thresholding, ieee trans. image process. vol.16, no. 3, 2007.
- [4] charles kervrann and jerome boulanger: optimal spatial adaptation for patch-based image denoising. ieee trans. image process. vol. 15, no. 10, 2006.
- [5] antoni buades, bartomeu coll, jean-michel morel: a non-local algorithm for image denoising. proc. cvpr 2005.
- [6] k. dabov, a. foi, v. katkovnik, and k. egiazarian: image denoising with block-matching and 3d filtering. proc. spie electronic imaging, 2006.
appendix
in this short time, you guys contributed presets for:
- canon eos-1ds mark ii
- canon eos 20d
- canon eos 30d
- canon eos 350d
- canon eos 400d
- canon eos 40d
- canon eos 450d
- canon eos 50d
- canon eos 550d
- canon eos 5d mark ii
- canon eos 5d mark iii
- canon eos 600d
- canon eos 60d
- canon eos 7d
- canon powershot g10
- canon powershot s90
- konica minolta dynax 5d
- nikon d300
- nikon d3100
- nikon d5000
- nikon d5100
- nikon d600
- nikon d7000
- nikon d80
- nikon d800
- nikon d90
- olympus e-30
- olympus e-400
- olympus e-420
- olympus e-m5
- olympus e-pl1
- panasonic dmc-fz18
- panasonic dmc-g3
- panasonic dmc-g5
- panasonic dmc-gf1
- panasonic dmc-gx1
- pentax k100d
- pentax k10d
- pentax k200d
- pentax k-5
- pentax k-7
- pentax k-x
- sony dslr-a200
- sony dslr-a230
- sony dslr-a550
- sony dslr-a700
- sony nex-3
- sony nex-6
- sony nex-7
- sony nex-c3
- sony slt-a55v
- sony slt-a65v
which seem to work great, thanks for that!
this also enables us to do nice cross-camera noise comparisons, like so:
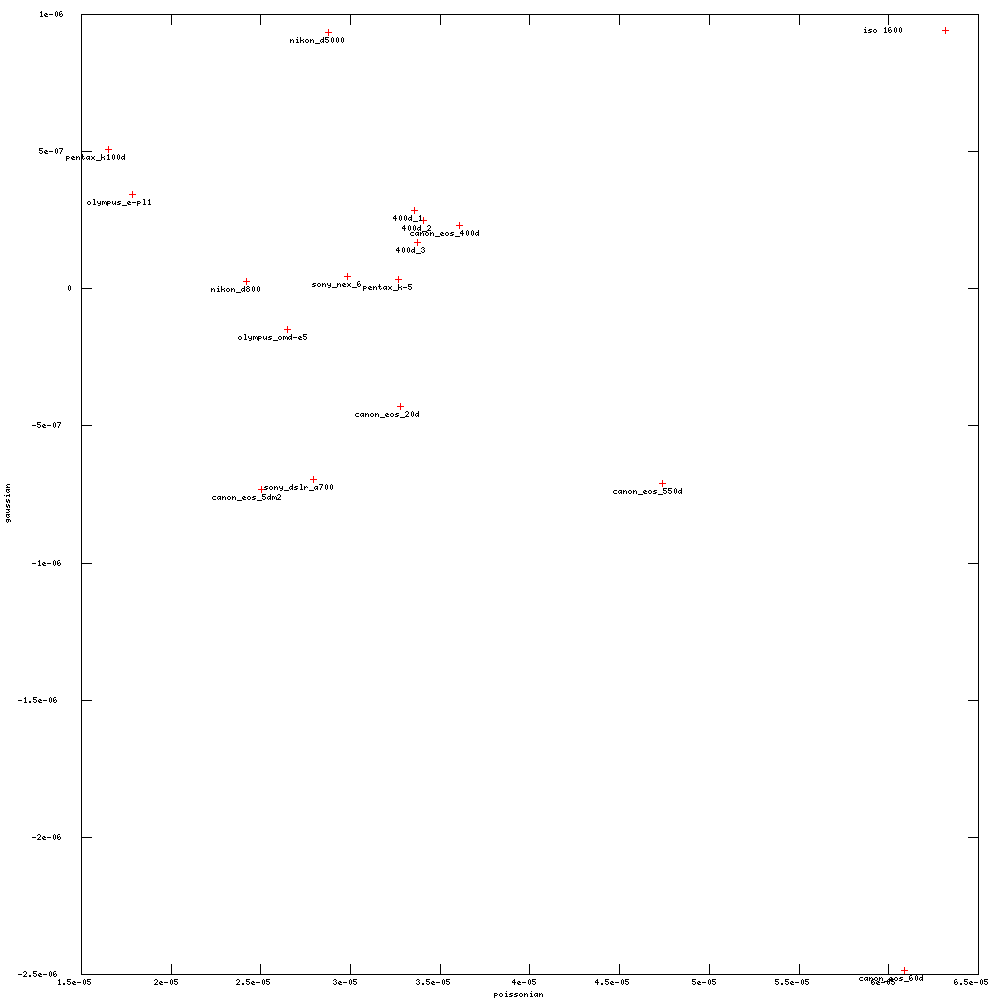
lower would be better for both axes, but note that lower gaussian noise level might just mean higher black level. so i wouldn’t base my camera purchase on these plots just yet.
note how the four versions of the eos 400d gather around almost the same spot. three of those have been taken at almost the same time, and one of them comes from a different day with different lighting. this shows that the method can produce consistent results (and that you might gain some accuracy by averaging a few runs). it would now be interesting to see how far away from that cluster a different device of the same type is, to verify using someone else’s presets is a good idea.
someone noted that, at times, noise still stays in your image, visible as large color blotches (not fine grained anymore). these can be alleviated by the equalizer, using something similar to this style.


Few questions:
* should the light causing the overexposure be white one (will LED one be too "bluish")?
* can the underexposed part be made by covering half of the lenses?
Is it possible to make it in Darktable 1.1 released or do I have to use dev version ?
In the case of auto, it's not possible to do all measurements, of course... but for 1/3 should we try? You mentioned interpolation, which is why I ask.
Have to try it this weekend.
Thanks for the hard work.
Can't wait to try it.
Excellent work.
This is really great news. Looking forward to test it in master.
There is an error in the make.sh which is looking for the "noiseprofile" program in ~/vcs/darkatble/tools/noise and not ~/darkatble/tools/noise
And you must run ./build.sh to compile noiseprofile too !
Great job !!
Regards
As the source code is too much for me, I sent the files to the mailing list. (Olympus E-PL1)
currently i'm only using a[1] and b[1] (green channel) and derive the others runtime via whitebalance settings (which makes some assumptions about white light and reasonable whitebalance i'm not quite sure about).
[edit: i think you meant same iso and average the values (a, b). yes, that makes sense too. even though the MAD statistic is robust, it comes with variance that you can take down using several shots]
underexposed could be a half covered lens, but an edge to a dark foreground object is better, as you're likely to get some gradient black->white out of it (and thus data in between, too).
really great work.
W.
"Illumination Decomposition for Material Recoloring with Consistent Interreflections"
[http://vis.berkeley.edu/papers/interreflections/].
I'm very happy with the results and have performed a subjective comparison on two specific photos of mine that I've been unhappy with. I was considering buying Lightroom and had just tested it (which also meant I needed to set up a temporary Windows computer).
Default Denoise (profiled) settings on my particular photos created noticeable colour banding and removed fine textures (people where wearing colourful costumes with similar colours, feathers etc...). Saying that, I compared to the photos produced by Lightroom and although they were slighyly better, also produced colour banding. I then went back and very quickly tweaked the patch size and strength settings and the results were excellent.
Great work on the noise profiling!!!
Before I e-mail the profile, the camera has built in noise handling for high ISO and long exposures under custom settings, should I keep these at default? Do we need profiles to take into account these settings or do they not impact the RAW images?
Just a note on how I compiled:
* I installed as per the instructions on this website. I might have needed to add the Darktable Release Plus PPA to get additional libraries but can't remember.
Ok, I wanted to profile my camera (Oly E30) so I did some shots from ISO 200 to 3200, copied the ORFs into the tools/noise folder and ran ./gen-profile -d .
The script did his job, the file and the pdfs are generated but I cannot see any presets when I run /opt/darktable/bin/darktable --library ./library.db from tools/noise folder. I assume that the presets should be on the denoise (profiled) module, right?
So, what am I doing wrong?
Thanks !
did you read through the output of the script? maybe it was complaining about your shots being not over/underexposed enough and aborted.
{"E-30 iso 200", "OLYMPUS IMAGING CORP.", "E-30", 200, {1.0f, 1.0f, {1.25000544229574e-05, 7.02465111426353e-06, 1.02274762732865e-05}, {-9.87788730741878e-08, -3.9579366931526e-07, -1.55476386202853e-07}}},
I notice that it ends with a comma; is it ok?
I don't know anything about sqlite3...
sometimes there's some exif confusion between exiv2 and raw reading libraries.
===> Record preset in library for testing purpose
make: Entering directory `/home/faktor/darktable/tools/noise'
make: Nothing to be done for `all'.
make: Leaving directory `/home/faktor/darktable/tools/noise'
I also ran the query select * from presets where operation='denoiseprofile' with no results..
Thanks for the help. I really want to try this to extend my pentax k-x life. I was seriously thinking of spending money on newer, less noisy models before reading this.
Thank you so much, guys. It is simply amazing. Compared to the results I got from Rawtherapee and in-camera jpeg engine, images from dt after profiling has less luminance noise and somewhat sharper. Against the unprofiled denoise, the advantage is less obvious, but it's there. However, chroma noise is more noticable on dt's images. I hope this can be addressed in the future.
Now, to whom do I send this noise profile file?
re: luma/chroma. if you want to keep your luma noise, just switch blend mode to `color'. if you want to blend luma/chroma, you can create multiple instances of the module and blend separately with different blend modes.
if you want a quick workaround against larger color blotches, try this style for the equalizer
If I take multiple shots per iso (different pictures), will the profiling be improved?
see: http://rawstudio.org/svn/rawspeed/data/cameras.xml
darktable is not able to import them or what do you mean by "not recognized"? Do you try to import from camera or from a folder? I suggest trying the latter one.
Are you sure you're using a recent version of Darktable (1.1.1 or git master).
i have done the following (ie for nex5):
1) manually taken the 7 shots with different iso-settings
2) copied shots from sd-card to ~/Pictures/tosafe/20121231.nex5.noiseprofile
3) imported the folder into darktable (git 1.1+289~g32d9d47)
4) applied the raw linear stile from the /darktable/tools/noise directory
5) ~/darktable/tools/noise/gen-profile -d ~/Pictures/tosafe/20121231.nex5.noiseprofile
I suppose there is a step missing, because 3) and 4) don't have any impact on the raws itself.
The shots can be downloaded here: https://picasaweb.google.com/103613694735983500100/20121231Nex5Noiseprofile
Error: Unable to find camera in database: NIKON CORPORATION NIKON D2Xs
It shows this error when starting the compiled version of darktable and selecting a nikon d2xs nef and enabling "noise profile" module.
The Profile made for the Nikon D2Xs cannot be located in its Database since darktable thinks its name is "maker:NIKON CORPORATION" and "model:NIKON D2Xs" but the metadata in the nef files shows only "maker:NIKON" model:"D2Xs".
It does not give this error for the Nikon D3 and its profile since the "maker" and "model" name "NIKON CORPORATION NIKON D3" is both the same in the database of darktable as the metadata .nef files from the camera.
Both camera profiles has been made with the gen_profile script and gphoto2.
Any fix for this?
PS:
When tethering Unmount/Remove/Eject the Camera first from Finder/Nautilus otherwise it will show as locked!
Is there something wrong with my testshots? They can be found here: https://picasaweb.google.com/103613694735983500100/20130103Nex5Noiseprofile#
Canon 1Ds mark 3: Succesfull
Profile generates ok, havent really tested the result yet.
Nikon D2Xs: Almost succesfull
Problem with database camera name see previous post.
Nikon D3: Succesfull
Profile generates ok, havent really tested the result yet.
Hasselblad H4d-60: Problem
Running the script ends as soon as it detects that all jpegs images are NOT over exposed, but in fact they are in Hasselblad Phocus / Gnome Preview. All generated jpegs from the .3fr file look the same no matter what iso and all Whites look clipped so it doesn't recognize overexposure but the 3fr files itself are really different and over exposed...
Hasselblad CFV-39: Problem
Almost the same problem as the H4D 3fr files. Running the script to make a profile works, but the profile itself is totally wrong. All develeped jpegs and Graph PDF files look the same no difference between iso 50-100-200-400-800. Just as the H4D files the 3fr raw files are really overexposed and look different for each iso level.
PS: testing the "denoise profile" module
Don't forget to start darktable from its "/opt/darktable/bin/darktable" location! Because the local darktable binary doesn't have the "denoise profile module".
Thank you :)
Thank you for your time and patience and sorry for the late response. At this moment I'm uploading some Hasselblad h4d and cfv39 raw 3fr to 'wetransferbeta' and mail the download link to the developers list of darktable on sourceforge.net as soon as it finishes.
You or other developers might have a look how those files are opened and handeled by darktable to fix the profiling issue.
The hasseblad files themself seem to be opened and edited by darktable but with standard kind of underexposing.
The .tar.gz archive contains tripod shot raw under/overexposed images from both of the camera's in all isos. Its big 1.1GB.
As soon as its online you receive a link.
{"DSLR-A850 iso 100","SONY","DSLR-A850",100,{8.03274706694361e-06,3.05589202633716e-06,4.98677350288896e-06},{-5.92030857781154e-08,-6.70027773398613e-08,-7.26577465835965e-08}},
Would it be possible to display the the selected preset? I think that would be advantageous to determine, whether the presets for a specific model is already available or the standard settings are used, when the module is turned on.
A few of them do not turn the picture black, but also do not seem to have an effect on the noise. The generic function does reduce noise, however.
http://www.darktable.org/redmine/issues/9153
Another question: the text says that whitebalance correction should be switched off ("this makes sure we get linear camera raw rgb with no basecurves, no whitebalance, etc in the way"). However, when I inspect the raw-linear stlye, darktable says that whitebalance is on under this style. I would switch it off manually but that seems impossible as there is no switch for that in the GUI.
Thanks.
Love DT.
I’m trying to generate presets for the Canon 1DMk.IV
I have DT1.1.2 on OSX 10.6.8, took pictures and put them in the 1D4 folder.
Then from the termianl:
Li-Loos-Mac-Pro:1D4 liloo$ ~/darktable/tools/noise/gen-profile -d .
-bash: /Users/liloo/darktable/tools/noise/gen-profile: No such file or directory
BTW. No success with tethering with E-M5 and 5D3.
Thanks.